Monday, November 25, 2013

Gotta Have Some Java

If you're like me, you love coffee.... I'm sipping on a cup of coffee while I write this post :)

Right now I'm in Christmas candy favor mode and since I love coffee and chocolate I thought I would make a coffee Christmas favor for my mini-series. So I decided to fill some Jaded Blossom 1x8 bags with chocolate covered coffee beans. Yummmmm :)


I used the Pretty Paper Pretty Ribbons Java Great Day cutting file and cut out this super cute coffee pot.

I added some googly eyes to make his eyes bulge out from all the caffeine... lol. The sentiment comes from Art Impressions which I embossed in black and tied on with some twine.

Thursday, November 21, 2013

Snow Balls

Anyone who knows me knows I love the snow. I love the snow covered trees, the smell of the fresh snow and the of course who doesn't love a good snow ball fight?

For my this favor (now the third in my series) I started with the Pretty Paper Pretty Ribbons Snow Much Fun cutting file. Using my Cameo I welded the shadows of the boy and the title together to make the base of my tag.

But since it was so small I ended up having to change the font and delete the snowflakes and the word "much". I also added a plastic confetti snowflake with a glue dot.


I added a Peachy Keen face from the In the Garden stamp set... Love these faces! Next I filled my Jaded Blossom 1x8 bag with white gumballs. Then finally I tied the tag on with some twine.

Here is the new version of this guy. I used the print and cut feature to redo the sentiment,


Wednesday, November 20, 2013

Rudolph's Spares

Here is the second holiday candy favor in my mini-series that I'm sharing with you : Rudolph's Spares.


I've had so much fun crafting these candy tubes and learning more and more about my Cameo and its features.

I cut the tag out of green cardstock and the top layer is from one of my Christmas Paper stacks. The sentiment is a print and cut.

Rudolph is cut out with my EK Success Deer punch. I cut out his antlers with some kraft cardstock and attached them with a glue pen. Then I added a googly eye and a shiny red nose.

I filled some Jaded Blossom 1x8 bags with shiny red gumballs and tied on the tag with some twine.

Heeeheee I just love the holidays, crafting and of course I love candy :)

Monday, November 18, 2013

Grinch Poop

Hi everyone! Well the last two weeks have been super busy and I have been crafting up a storm between working and sleeping.. lol. In a previous post I told you that I bought a bunch of the Jaded Blossom 1x8 bags for candy and I thought I would do a mini-series of candy tube favors.

So I will start with my favorite so far... the Grinch! I grew up watching How the Grinch Stole Christmas and still watch it every year! So if course I had to use the Grinch for one of the favors.

This is the print and cut version... not the best picture - it's from my camera
I used my Silhouette and welded two shapes together to make the base of the tag. Then used the print and cut feature with the Grinched font for the sentiment. For the Grinch I did him 2 different ways one version a print and cut and the other paper pieced together.

I filled the tubes with Grinch poop (aka green gumballs) and just love how they turned out.

I will post pictures of each of the fun yummy filled favors as the week goes on.

Happy crafting!

Here is the Grinch that I put together instead of the print and cut.


Saturday, October 19, 2013

Beware the Monster Eyes

Hello everyone just wanted to share one of the Halloween favors that I'm working on right now. I love Halloween, getting dressed up, getting to go to the haunted house, carving pumpkins and of course the candy! I love the candy!

I filled a Martha Stewart test tube favor with some chocolate eyeballs... yummm.

Then I made a box for the test  tube to sit in and covered it with paper that I printed on my computer.


I used the Jaded Blossom Monster Mash stamp set to make my tag. I stamped the sentiment in Tim Holtz Pine Needles then colored in the eyeballs with Copics. I matted my tag with the Spellbinders Pumpkin Circles then I tied the tag on with some Doodlebug Twine.


I will post more of the favors that I'm making and all the fun I am having this Halloween surrounded by candy.

I'm entering this into the Jaded Blossom October Challenge : Anything Halloween Theme. Make sure to head on over and check out all the great projects!

Sunday, October 13, 2013

Thankful For You!

 About a month ago I ordered some 1"x8" clear treat bags from Jaded Blossom.


I love them so much I just ordered more :) I also bought a ton of candy, I may have gotten a wee bit out of control when it came to candy :) There is candy everywhere in my craft area... heeehee.

So I made these super cute treats for the upcoming holiday using the Jaded Blossom 1"x8" bags filled with Reese's Pieces in fall colors.


The Chipmunks, sentiment and the small acorns on my tag are from the Peachy Keen October 2012 stamp of the month and colored with my Copics.


I made the tag with the acorn from the Cricut Create A Critter cartridge and ran the top piece through the Cuttlebug with the Mesh folder.

The sentiment is stamped in Tim Holtz Ripe Persimmon and cut out using the Spellbinders Nautical Frames and Accents. I finished the tag by using my Crop-A-Dile to punch a small hole in the tag and ran some orange twine to tie it together.

I will be entering this into the Peachy Keen Challenge # 13-41 Anything Goes.

Friday, October 11, 2013

Little Monster Bash

I helped a girlfriend out with some baby shower decorations, for one of her friends that has a baby on the way. They know that it is a boy, so they decided to have a Monster Bash. I picked some of the characters from their baby shower invitation plus a few extras and started making a banner.


I used my Silhouette and the print and cut feature to make the monsters.


 The monsters are sized either 10 1/2" tall or wide, then I gave each of the monsters a shadow. 
  

Using a Silhouette file I made the banner pieces in blue and green. I used a light blue cardstock for the dark blue banner pieces along with the Spots and Dots embossing folder to give each piece some dimension.


For the green banner pieces I used a pattern from the Kaiser Craft Blast Off paper pack.


I used star brads to attach each of the pieces together and then star eyelets on the ends to hang from.


Using the same monsters I decided to make a few favors. I filled some Jaded Blossom 1x8 bags with green blue and teal skittles. I re-sized the banner pieces and used them to make tags for the favors. Then added some washi tape and some Monster googly eyes.


Placed them all in a vase with some blue tissue paper and green Rickrack.


Wishing the happy couple all the joy in the world with the upcoming arrival of their little monster.

Friday, September 13, 2013

Back To My New Toy!

I'm so excited to finally get some crafting done this week. Lots has happened over the summer and there are some great photos just waiting to be made into layouts.

I had an amazing vacation in the sunny Okanagan that begged for another month.. lol. I just reorganized my craft area too. I picked up this 4 sided rotating pegboard on Used Victoria....LOVE IT! It has become my new embellishment center and I can see everything.. brads, rhinestones, Stickles, Liquid Pearls. I could use another one though... Heeheee.

And finally as all the kids are going back to school (not that I have any yet!), and I've started a new job. I hope everyone had a great summer too!

Now back to my new toy, I finally got to play with the Print and cut feature. Did I happen to mention how much in LOVE I am with my Cameo?!

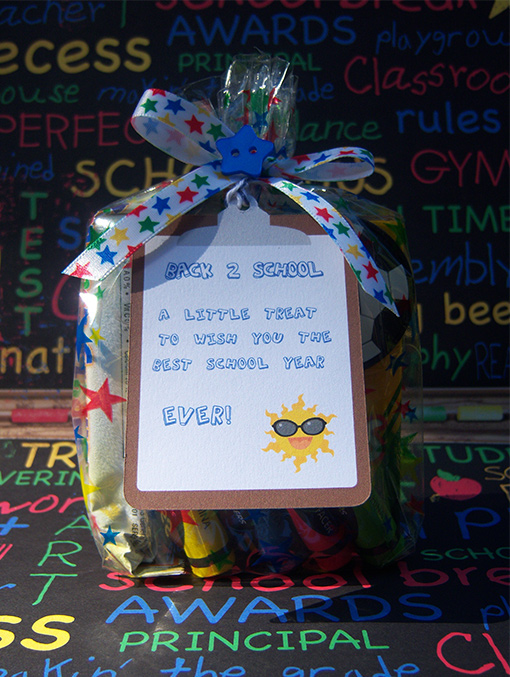
I made a Back 2 School treat for a special little back-to-schooler. I used the Pretty Paper Pretty Ribbons Clipboard and Cool Sun cutting files to make a tag about 3 3/8" tall. Then I added some blue text, shrank them down and ran it through the printer, finally sending it to the Cameo to cut.


I filled a star treat bag with a box of Crayons, crayon shaped erasers, a soccer ball bookmark and a granola bar. Made a bow with some star ribbon and finished it with a blue star button.


I will be entering this into the PPPR Back to School Challenge. Make sure to head on over to the Pretty Paper, Pretty Ribbons store and check out all the fabulous designs. There is even a Freebie every Friday!

>

Wednesday, June 19, 2013

My Digital Birthday Card

So I went from not posting for over a month to two posts in one day.. haha. Time to get back to crafting.

I just wanted to share the card that my other half made for me for my birthday. It's so darn cute!

He always goes on about digital stamping and digital paper and how I should use it more often. Last year for my birthday I said I wanted Bacon and Eggs for my birthday and that's exactly what I got... he made me a Bacon and Eggs SVG, along with a card he made using digital paper and font. There's a link so you can download my Bacon and Eggs SVG on my post from last year.

So of course this years card was you guessed it... made using digital images and my printer.

heeeheeeeheee this is to cute!
He even used a program to make his actual hand writing into font to use and print off the computer.


This was on the back of the card and I cashed it in right away and even managed to get two foot rubs :)


 Maybe one of these years I will find some time to play with digital stamps and paper.

Hope everyone has a great day!

How Time Flys.

Well the month of may flew past like the blink of an eye. So many things went on last month which left little time to craft.

One of those many things going on in the month of May was my 35th birthday... I can't believe I'm 35! Time goes by so fast these days.

Well I decided to treat myself to the Silhouette Cameo Designer Edition.... heeeeheee. Yay for new toys! Now I just have to find it a home upstairs in my craft area :p

Even tho lots was going on I did however make two cards for a little girl who broke her arm.

The first card I used my  brand new Silhouette Cameo along with the "That Hurt" file from Miss Kate Cuttables. There are so many cute files to choose from on the Miss Kate Cuttables site... I love them all! I used some SU dimensionals to pop up the title.

Then using a $1.50 stamp I got at Michaels I made my background paper, matted it in black and then placed that onto a red card base.

 
For the inside sentiment I used the same stamp as the background paper only stamped in American Crafts red Ink instead.

 
Super happy with the way it turned out...I LOVE my Cameo!

For the second card I used a piece of patterned paper from my stash and cut out only the part I wanted. Gave it a mat, added some ribbon and stamped my sentiment in Memento Black ink.

The sentiment is from the Pink By Design set called Joyful Tags.


For the inside I first stamped the horse from the Best in the West stamp set in some Memento Lilac ink and then stamped the sentiment from the Cowgirl Up stamp set on top of the horse.

Both stamp sets are from Pink By Design.


Well I'm sure I will spend a lot more time in my craft area over the next few months playing with my new toy, trying to figure out how to use all the features on it. So many things to do and so little time.

Hope everyone is having a great start to the summer.

Wednesday, May 1, 2013

Twinkle, twinkle

It has been along time since I've posted anything... I have been working both jobs and there has been no time for crafting. So today I thought that I would run up to the craft area for a bit and enter the current challenge over at Peachy Keen.

13-17 : Sketch Challenge


I started by making my little astronaut. I used the Cricut Lite B is for Boy cartridge and cut him out at 2 1/2 ", it's hard to tell but I used Acetate to make his space helmet. Then I stamped this adorable face from the Peachy Keen Wide Eyed Kids Assortment and a White Gelly Roll Pen, Bic Markers and some chalk to color in his face.


 I made my little green Alien using a Fiskars heart punch for his body and an egg shaped punch for his head. I used the Peachy Keen Simple Simons Assortment in 3/8, it made the perfect alien face. His spaceship is from the Cricut Boys Will Be Boys cartridge but I cut off the top antenna and feet and added some rhinestones.

The sentiment is from my newest Peachy Keen set that I just got last week Twinkle Twinkle Sentiments. Love this set it is very cute!

The background paper is from DCWV All About Boys Stack and the green stars paper is from Crate Paper Party Day collection  called Wish. I used Spellbinders Classic Circles, Star Circles and the Provocraft Spots and Dots embossing folder for my planets.

Make sure to head on over to the Peachy Keen Blog and enter the challenge yourself.

Saturday, April 6, 2013

24 Carrot Friend

Last year I picked up these cute carrot boxs from Michaels in the clearance section and knew they would come in handy at some point. So I thought that I would make something with them for the Easter weekend.

I filled each carrot with yummy Jelly Beans, made a cute little carrot tag and gave them out at work.
I love all the holidays and like to make little things to put smiles on my friends faces.

I used the Create A Critter cartridge to cut the carrots and their shadows at 2 3/4". Then used the Pink By Design Hoppy Easter stamp set for the sentiment and embossed them in Stampendous Black.


I attached the carrot tag to the large carrot with some Divine Twine in green looped through a hole I made with my Crop A Dile.


Fast and easy, fun and yummy!  

Next year I want to have a glow in the dark Easter egg hunt! I saw them on Pinterest and just know they would be so much fun.

Wednesday, March 27, 2013

Hoppy Birthday

This week I decided to use the Peachy Keen Challenge 13-12 A sketch for a co-workers birthday.

Here is the sketch:


Her birthday is at the end of the month and so is Easter so I used the Create A Critter cartridge to make a Easter Bunny and a cute little cupcake.

I used the Peachy Keen Critter Faces Set AMedium for the bunny and the Peachy Keen Wide Eyed Kids Assortment in 3/8 for the cupcake. I added some Glossy Accents to give the cherry a little shine.

The front sentiment comes from the Pink By Design Take The Cake stamp set and it is embossed in Recollections Party Pink.


The base of the card is embossed with a Couture Creations Houndstooth Embossing folder. The patterned paper is Echo Park Birthday Girl.  Divine Twine in Pink, American Crafts Ribbon and Bella Blvd Designer Tape in Pickle Juice Chevron embellish the front.


The inside sentiment is from the Pink By Design Hoppy Easter stamp set in Memento Tuxedo Black Ink.